How to Anchor a Pergola on Concrete: Safe DIY Guide
Table of Contents
- Choosing the Right Post Anchor for Your Concrete Slab
- Tools and Materials You'll Need Before You Start
- Best Concrete Anchors for Pergola Posts
- How to Drill Into Concrete for Pergola Posts
- Securing a Pergola to a Concrete Slab Without Drilling
- Getting the Posts Plumb, Square, and Level
- Wind Load, Corrosion, and Safety Checks for Anchored Pergolas
- Frequently Asked Questions
Last Updated: October 4, 2026
Choosing the Right Post Anchor for Your Concrete Slab
Choosing the right anchor pergola base for concrete starts with picking the right post base, and getting that choice wrong is the most common reason a pergola feels wobbly within a year. The fix usually comes down to three decisions: the anchor style, the anchor length, and whether your slab is actually strong enough to hold the load.
Stand-Off Bases vs. Flush Base Plates
A stand-off base lifts the wood post about an inch above the slab. That gap keeps water from wicking into the end grain, which is where rot begins. Flush base plates sit tight against the concrete and look cleaner, but they trap moisture under the post.
For most backyard builds, we recommend a stand-off base. It costs a little more and adds a small step to your install, but it protects the wood for years.
Matching Slab Thickness to Anchor Length
Your anchor must reach deep enough to grip the slab without punching through the bottom. A good rule: the anchor should embed at least half the slab's thickness. A 4-inch slab works with a 2.5-inch embedment. A 6-inch slab gives you more room.
If your slab is thin or cracked, switch to an adhesive anchor or add a concrete footing. American Concrete Institute guidance on anchorage covers embedment basics in plain terms.
The Slab Strength Question Most Guides Skip
Here is the part that separates a pergola that lasts from one that cracks its own foundation: your slab's compressive strength and thickness.
When you drill a wedge anchor into a thin, weak slab, the expansion force can crack the concrete from the inside.
How to check your slab before you commit:
- Thickness: Drill a small test hole at one post location with a 1/4-inch bit. Measure the depth where the bit breaks through or bottoms out. If you hit less than 3 inches of solid concrete, do not use expansion anchors.
- Condition: Tap the slab with a hammer. A dull thud instead of a sharp ring can indicate a hollow spot or delamination. Move your post location if you find one.
- Cracks: Hairline cracks are usually cosmetic. Cracks wider than a credit card, or cracks that run through a planned post location, mean the slab is compromised. Route the load to a new footing instead.
If your slab fails any of these checks, you have two safe options. The first is an epoxy anchor, which bonds to the concrete without expansion force and performs well in cracked or thin slabs.
Anchor Type Comparison
| Anchor Type | Best For | Minimum Slab Thickness | Minimum PSI | Holds Up To |
|---|---|---|---|---|
| Wedge anchor | Solid, thick slabs | 4 in | 2,500 | Heavy uplift |
| Sleeve anchor | Medium-duty posts | 4 in | 2,500 | Moderate uplift |
| Epoxy anchor | Thin or cracked slabs | Any | 2,000 | Heavy uplift |
| Tapcon screw | Light posts, light loads | 3 in | 2,500 | Light uplift |
Why Anchor Length Alone Is Not Enough
A 5/8-inch anchor pergola wedge with 3 inches of embedment in a 6-inch, 3,500 PSI slab will outperform the same anchor in a 4-inch, 2,500 PSI slab every time. The concrete around the anchor is part of the holding system. When you torque the anchor, you are asking the concrete to resist a cone-shaped pullout failure. Thicker, stronger concrete means a larger failure cone and more holding power.
Tools and Materials You'll Need Before You Start
Gather everything before you drill. A missing tool mid-job means a trip to the store and a hole that sits open.
Tools:
- Hammer drill with a masonry bit matched to your anchor size
- Shop vacuum or brush for clearing dust
- Torque wrench
- 4-foot level and a framing square
- Chalk line and pencil
- Safety goggles, gloves, and a dust mask
Materials:
- Post anchors or stand-off bases
- Wedge, sleeve, or epoxy anchors
- Galvanized steel fasteners
- Pressure-treated lumber or cedar posts
- Shims for leveling
Best Concrete Anchors for Pergola Posts
Wedge anchors are the top pick for most pergola posts on a solid slab. They expand as you torque them down and resist both pull-out and sideways force.
For coastal homes, choose hot-dip galvanized or stainless steel. Salt air eats plain steel fast. ASTM standards for corrosion-resistant fasteners explains the coating ratings.
Epoxy anchors shine on thin or cracked slabs. The adhesive fills voids and grips the full hole depth. They take longer to cure, but the hold is excellent.
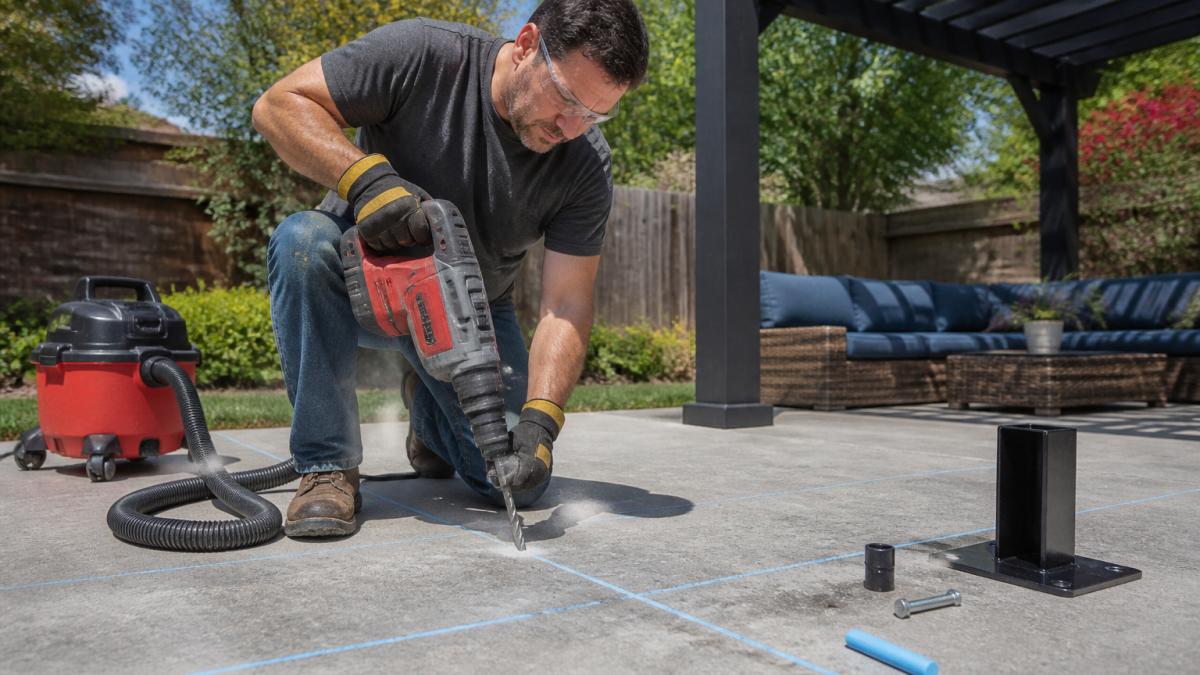
How to Drill Into Concrete for Pergola Posts
Drilling into concrete is the step that decides whether your pergola stays put. Take it slow, keep the bit cool, and clean every hole. The whole job takes about an hour for four posts.
Step 1: Mark and Check Your Layout
- Set your post bases where the posts will stand.
- Measure diagonals corner to corner. They must match.
- Snap chalk lines through the base plate holes.
- Mark each hole with a pencil.
- Double-check spacing before you drill.
Step 2: Drill, Clean, and Set the Anchors
- Fit the masonry bit to your hammer drill.
- Drill each hole to the marked depth.
- Pull the bit out and clear dust with a vacuum.
- Set the anchor and tap it flush.
- Torque each fastener to spec.
Concrete dust left in the hole weakens the grip. Blow it out, then vacuum again.
Verona 8 Ft. X 8 Ft. Light Brown Wooden Cabana Pergola with Bamboo Privacy →
Securing a Pergola to a Concrete Slab Without Drilling
You can secure a pergola on concrete without drilling, but only for light, temporary setups. Weighted bases filled with sand or water hold a small structure in calm weather. Ground stakes won't work on a slab.
For a permanent build, drilling is the safe choice. A weighted base can tip in high wind, and that puts people and property at risk. If you rent and can't drill, look at a freestanding design with a wide, heavy footprint.
Getting the Posts Plumb, Square, and Level
A pergola that looks crooked is almost always a leveling problem, not a build problem. Check plumb on two sides of every post. Use a framing square at the corners to confirm 90-degree angles.
Shim any gaps under the base before you torque the anchors down. Once the anchors are tight, recheck plumb one more time. Small errors compound fast across an 8-foot span.
Wind Load, Corrosion, and Safety Checks for Anchored Pergolas
Wind is the force that pulls most pergolas loose, and uplift is what you're fighting. Understanding how uplift works, and how much your area demands, is the difference between a structure that survives a storm and one that becomes a projectile.
How Wind Uplift Actually Works on a Pergola
A pergola is essentially a flat plate held above the ground on posts.
For a typical 10-foot by 10-foot pergola with a solid roof, a 40 mph wind can generate hundreds of pounds of uplift.
This is why a pergola that feels rock-solid on a calm day can lift and shift in a storm. The dead weight of the wood is working against you, not for you, once uplift exceeds it.
Finding Your Required Wind Speed
Building codes in most jurisdictions reference the wind speed maps published by the American Society of Civil Engineers in ASCE 7, the standard for minimum design loads. Your local building department can tell you the design wind speed for your address.
If you are in a high-wind region, your pergola may need engineered connections, larger anchors, or a fully engineered roof system. A kit pergola rated for 45 mph is not appropriate for a 110 mph design wind speed zone.
Corrosion Resistance: Matching Hardware to Your Climate
Salt air, humidity, and acid rain all attack metal fasteners. The wrong hardware can fail in a few years, long before the wood or the slab shows any problem.
- Hot-dip galvanized steel: A zinc coating typically 2 to 3 mils thick. Good for most inland and moderately humid climates. Expect decades of service in dry conditions, less in coastal salt air.
- Stainless steel (304 grade): Resists corrosion well in most environments, including many coastal areas. A common choice for pergola hardware near salt water.
- Stainless steel (316 grade): The marine-grade standard. Contains molybdenum for superior resistance to chlorides. Specify 316 for direct coastal exposure, pool enclosures, and areas with road salt.
ASTM standards for corrosion-resistant fasteners explains the coating and alloy ratings in detail. If you are within a few miles of salt water, skip galvanized and go straight to 316 stainless.
Safety Checks That Belong in Your Routine
- Wear goggles and a dust mask when drilling. Concrete dust contains crystalline silica, a known respiratory hazard. A simple N95 mask is the minimum.
- Keep cords clear of wet concrete. Water and power tools do not mix, and a wet slab is common after rain.
- Never over-torque an anchor. Over-torquing strips the threads or cracks the concrete. Follow the manufacturer's torque spec, typically 25 to 50 foot-pounds for a 1/2-inch wedge anchor, but always check the label.
- Inspect anchors each spring. Look for rust streaks, loose nuts, and any gap between the base plate and the slab. A quarter-turn of snugging on a loose nut is cheap insurance.
- Check after every significant storm. High wind can loosen anchors even if the pergola looks fine from a distance.
FEMA guidance on wind-resistant outdoor structures offers free checklists for storm-prone regions, including guidance on anchoring and load paths.
When to Call an Engineer
If your pergola is large, attached to a house, or located in a high-wind or seismic zone, a licensed structural engineer can review your anchor plan and slab capacity.
Our Aluminum Louvered Pergola is built to withstand wind speeds up to 45 mph and snow loads up to 2,500 lbs, which makes it a strong match for exposed yards. If your design wind speed exceeds that rating, consider a custom-engineered solution.

Frequently Asked Questions
How can I anchor my pergola without drilling holes?
You can secure a pergola to a concrete slab without drilling by using weighted bases filled with sand or gravel, or by installing a freestanding pergola that relies on its own weight and cross-bracing for stability. These methods work for smaller, lighter structures in low-wind areas. For larger pergolas or regions with high winds, drilled anchors provide far greater uplift and lateral resistance, so check your local building requirements before choosing a no-drill approach.
What is the best way to install pergola posts on concrete?
The most reliable method is to set stand-off post bases on the slab, then fasten them with wedge anchors or sleeve anchors sized for your slab thickness. Mark your layout, drill holes with a hammer drill and masonry bit, clean the dust, and torque each anchor to the manufacturer's spec. Stand-off bases keep the wood above the concrete so moisture drains away, which extends the life of pressure-treated lumber. Check plumb and square before final tightening.
Do pergolas need to be anchored in the ground?
Freestanding pergolas should be anchored to prevent tipping from wind uplift and lateral loads. Anchoring to an existing concrete slab with post bases and wedge anchors is usually enough for residential sizes. If you have no slab, concrete footings poured below the frost line give the strongest hold. Local building codes may specify footing depth and anchor requirements, so confirm before you build.
How deep should concrete be to support a pergola?
For anchoring into an existing slab, a minimum thickness of 4 inches is common for light pergolas, but thicker slabs handle longer anchors and greater uplift loads better. Wedge anchors need enough depth to fully seat, so match anchor length to slab thickness and never drill through the bottom. If you are pouring new concrete, footings 12 inches wide and below the frost line are typical for pergola posts.