DIY Pergola Installation: Concrete Footing Guide
Table of Contents
- Why Pergola Concrete Footings Matter
- Permits, Utilities, and Local Code Requirements
- How Deep to Dig Pergola Footings
- Pergola Concrete Footing Size and Load Calculations
- Marking, Digging, and Preparing Post Holes
- Pouring Concrete and Installing Pergola Post Base Anchors
- Anchoring a Pergola to an Existing Concrete Patio
- Curing, Inspection, and Long-Term Maintenance
- Frequently Asked Questions
Last Updated: October 15, 2026
Why Pergola Concrete Footings Matter
A solid concrete footing is the foundation of every pergola that stands for decades. Without proper footings, your pergola shifts, settles unevenly, and eventually fails. Footings distribute wind loads, post weight, and anything you attach to the structure into the ground below the frost line, where soil stays stable year-round.
This diy pergola installation concrete footing guide covers permits, frost lines, footing sizes, layout, and the pour, so you'll know whether to DIY or call a pro.
Permits, Utilities, and Local Code Requirements
Before you dig, check local building codes and utility lines.
Call 811 at least three business days before digging (811 Before You Dig).
Visit your local building department.
Some jurisdictions require footing inspections before you pour, and a few require engineered drawings for larger pergolas.
Get everything in writing to protect yourself and ensure your pergola meets code for resale and insurance.
How Deep to Dig Pergola Footings
Frost line depth is the critical number.
Frost depth varies from about 12 inches in the South to over 48 inches in northern states.
Your footing holes must extend at least 6 inches below the frost line.
Why this matters:
- Posts that move seasonally crack concrete, loosen fasteners, and shift the structure
- Frost heave can lift a post 2-3 inches per year
- Deeper footings cost more but prevent expensive repairs
Measure from the ground surface down and mark the depth on your shovel.
If you hit rock or water before reaching depth, stop and contact a professional, both require different solutions.
Pergola Concrete Footing Size and Load Calculations
Most guides hand you a single number, "dig a 12-inch hole, 36 inches deep", and move on. That's a starting point, not an answer. Footing size depends on four variables: load, soil, wind and snow exposure, and frost depth.
Start with the loads
A footing resists two things: downward load and uplift/overturning.
- Downward (dead + live) load. A 12x12 cedar pergola with 6x6 posts and a slatted roof might weigh 600-900 lbs total, or roughly 150-225 lbs per post. Add snow: a 20 psf ground snow load over a 144 sq ft footprint is about 2,880 lbs, split across four posts. That drives bearing area.
- Uplift and overturning. Wind pulls up and sideways. A 90 mph gust on a 12x12 open pergola can generate hundreds of pounds of uplift per post. Footings are sized for weight and anchored for pull-out, not just dug deep.
In high-wind or heavy-snow regions, uplift governs the design, not bearing, you need more mass and a better anchor, not just a wider hole.
Match diameter to soil, not habit
Soil bearing capacity is the load the ground carries per square foot before settling. Typical values:
- Competent clay or dense sand: 2,000-3,000 psf
- Loose sand or silty soil: 1,000-1,500 psf
- Soft or organic soil, fill dirt: under 1,000 psf, do not build on it without engineering
A footing carrying 1,000 lbs on 2,000 psf soil needs about 0.5 sq ft of bearing area, a 10-inch diameter. The same load on 1,000 psf soil needs 1 sq ft, or roughly 14 inches.
Practical diameter ranges:
| Post size | Typical span | Minimum diameter (good soil) | Diameter (poor soil / high wind) |
|---|---|---|---|
| 4x4 | under 8 ft | 8-10 in | 12 in |
| 6x6 | 8-12 ft | 10-12 in | 14-16 in |
| 8x8 | 12-16 ft | 12-14 in | 16-18 in |
These are starting points. If soil is soft, spans are long, or design wind speeds hit 90+ mph, size up and consider a stamped design.
Depth is frost plus bearing
Depth does two jobs: gets the footing below the frost line and puts enough concrete mass in the ground to resist uplift. The rule is 6 inches below the local frost line minimum, often 42-54 inches in cold climates. In warm climates with 12-inch frost, a 24-inch footing is common, but check uplift, since shallow footings in sandy coastal soil pull out easily.
Concrete volume and bag math
Volume of a cylinder = π × r² × depth. Worked example for a 12-inch diameter hole, 42 inches deep:
- Radius = 0.5 ft, so r² = 0.25
- π × 0.25 = 0.785 sq ft
- × 3.5 ft depth = 2.75 cubic feet per hole
A four-post pergola at 2.75 cu ft per hole needs 11 cubic feet total.
Bag yield:
- 60 lb bag ≈ 0.45 cu ft
- 80 lb bag ≈ 0.60 cu ft
11 cu ft ÷ 0.45 = about 25 bags of 60 lb mix, or about 19 bags of 80 lb. Add 10% for spillage and uneven holes, buy 28 bags of 60 lb.
When to stop and get engineering
Get a stamped design or engineer's review if any of these apply:
- The pergola is attached to the house (load path into the structure)
- Design wind speed is 100 mph or higher
- Ground snow load is 30 psf or higher
A one-hour consultation is cheap insurance against a footing that fails inspection or, worse, fails in a storm.
Marking, Digging, and Preparing Post Holes
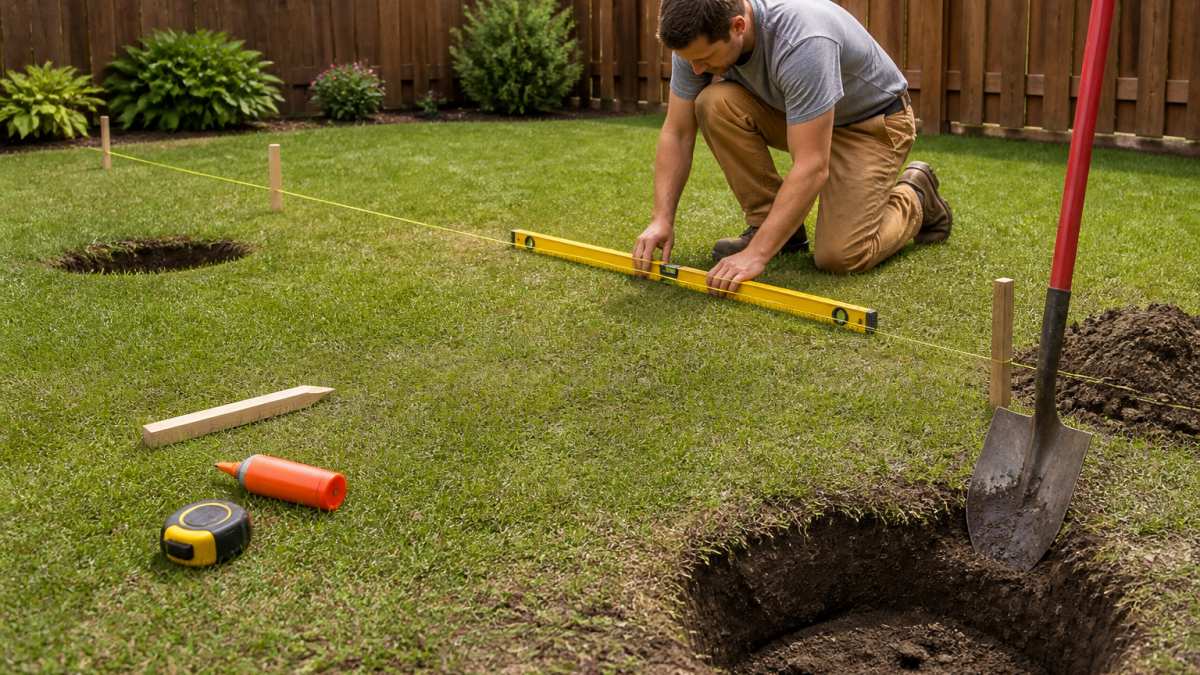
Layout is where most DIY pergolas go wrong. A hole 2 inches off in one corner looks fine on the ground but produces a racked, un-square frame no force will fix later. The fix is a repeatable layout method, not "be careful."
Step 1: Establish a reference line and square the corners
Pick the longest, straightest edge as your baseline. Drive two stakes at the ends and run a string between them, that's your reference.
To square the corners, use the 3-4-5 method (a Pythagorean triple):
- From the corner stake, measure 3 ft along the baseline and mark it.
- Measure 4 ft along the perpendicular direction and mark it.
- The distance between those two marks must be exactly 5 ft. If it is not, rotate the perpendicular line until it is.
Scale it up for accuracy: 6-8-10 or 9-12-15. The longer the triangle, the smaller your error.
Step 2: Set batter boards
Batter boards are horizontal boards staked just outside each corner, above ground, holding your string lines. They let you re-string the layout after digging destroys your ground marks.
- Drive two stakes per corner, about 2 ft apart, outside the footprint.
- Screw a horizontal board across them at a comfortable height.
- Run strings between batter boards to mark both the outside edges and the post centerlines.
Step 3: Verify with diagonal measurements
This is the check most DIYers skip. For any rectangle, the two diagonals must be equal. Measure corner-to-corner both ways.
- If diagonal A is longer than diagonal B, the frame is a parallelogram, not a rectangle.
- Nudge the corners until the diagonals match within 1/8 inch.
Do this before you dig, it's the most reliable square check there is.
Large Outdoor Cedar Wood Pergola Kit With Slatted Roof →
Step 4: Mark and dig the holes
Drop a plumb bob or use a level to transfer each string intersection to the ground. Spray-paint a circle the diameter of your footing at each mark.
Digging tips:
- Post-hole digger: best for 6-8 inch holes in soft soil, cheap, slow.
- Hand auger: faster in clay, but hard work.
- Power auger: fastest, but hard to control and can wander off-line. Use a string line to check the bit stays centered.
Dig straight down and check plumb with a level on two sides as you go. Tape your target depth on the tool handle, holes always look deeper than they are.
Step 5: Prepare the hole bottom
- Remove loose soil and roots, then compact the bottom with a hand tamper.
- Add 2-3 inches of 3/4-inch crushed gravel and tamp flat for drainage and a stable base.
Step 6: Re-string and check alignment before pouring
After digging, re-run your strings on the batter boards. For each hole, confirm the center is under the string intersection, the hole is plumb, adjacent centers match your plan, and the diagonals still match.
If a hole is off, you can often shift it a few inches by re-digging one side, but only before concrete. After the pour, a misplaced hole means a misplaced post.
Pouring Concrete and Installing Pergola Post Base Anchors
Mixing concrete:
Follow the bag instructions, typically one part cement, two parts sand, three parts gravel.
Mix in batches. A power mixer speeds this up; hand-mixing more than 10 bags is exhausting.
Pouring:
Pour each hole to ground level or slightly above, tamping gently with a stick to release air bubbles.
Installing post base anchors:
Post base anchors bolt to the concrete and hold the post. Common types:
- Wet-set bases (set into concrete before it hardens)
- Bolted anchors (bolted to cured concrete)
- Screw piles (twisted into ground, no concrete needed)
For wet-set bases, position the anchor in fresh concrete, check level and plumb, and hold it while concrete sets.
Let concrete cure fully before setting posts. Most reaches usable strength in 24-48 hours, but full cure takes 28 days, don't load the structure during this time.
Anchoring a Pergola to an Existing Concrete Patio
If your pergola sits on an existing patio, you can't dig below ground.
Surface-mounted anchors:
Insert wedge or expansion anchors and tighten slowly, the anchor expands inside the concrete, creating a mechanical lock.
Torque anchors to the manufacturer's spec. Under-tightening leaves play; over-tightening cracks concrete.
Screw piles:
Screw piles twist into the ground like a giant corkscrew, working through patio cracks or alongside the edge.
Checking your work:
After anchoring, try to move the post, there should be zero play.
Curing, Inspection, and Long-Term Maintenance
Concrete cures fastest in warm, moist conditions.
After 28 days, concrete reaches full strength. Only then should you fully load the pergola with posts, beams, and roof material.
Inspection checklist:
- Walk around the pergola and look for concrete cracks wider than ¼ inch
- Check that posts are plumb (use a level on two sides)
- Verify no movement when you push on the posts
Small hairline cracks are normal. Wide cracks or spalling suggest mix, curing, or frost problems.
Long-term maintenance:
Seal concrete every 2-3 years to slow water penetration and extend footing life.
If posts shift or concrete cracks, address it immediately, small problems become big ones quickly.
Installing pergola concrete footings correctly is the single most important step in building a pergola that lasts. The cedar pergolas at Oasis Patio Direct, like our Premium Outdoor Cedar Wood Pergola With Slatted Roof and Large Outdoor Cedar Wood Pergola Kit With Slatted Roof, are built to last decades on solid footings.


Frequently Asked Questions
How deep should concrete footings be for a pergola?
Pergola footings must extend below your local frost line to prevent heaving from freeze-thaw cycles. Frost depth varies by region, ranging from 12 inches in warm climates to 48 inches in cold areas. Check with your local building department or use the USDA frost-line map for your zip code. As a general rule, dig at least 30% of your post height below ground. For a 10-foot pergola, that's typically 30-36 inches minimum in most climates.
What size concrete footing do I need for my pergola?
Footing diameter depends on soil type, pergola dimensions, and wind load in your area. Standard practice uses 10-12 inch diameter holes for typical residential pergolas with 6x6 posts. Sandy or loose soil may require larger footings (12-14 inches) for stability. Pour concrete at least 8-10 inches above grade to protect the post base from water. For exact sizing, consult local building codes or have your soil tested if you're in a high-wind zone.
Can you anchor a pergola to an existing concrete patio?
Yes, but it requires surface-mounted post bases or wedge anchors drilled into the concrete. Use ½-inch or 5/8-inch wedge anchors spaced per the manufacturer's instructions, typically 12-18 inches apart around each post base. Drill pilot holes with a concrete bit, install anchors, and tighten securely. This method works best for patios 4 inches thick or deeper. For thinner concrete or high-wind areas, consider adding diagonal bracing for extra stability.
How long should concrete cure before I install the pergola?
Standard concrete requires 7 days of curing before bearing significant load, though it reaches 80% strength in 3-4 days. In cooler weather below 50°F, cure time extends to 10-14 days. Avoid installation during active curing, and keep freshly poured footings moist by misting or covering them. Once fully cured, anchor your pergola posts securely and check alignment before final assembly.